top of page


336.629.3150 114 Old Liberty Road Asheboro, NC 27203
QUALITY IS IN OUR CULTURE
1970 Plymouth Superbird - "Project Hellbird"
What happens when a 1970 Plymouth Superbird meets a 707 HP Hellcat Engine? Follow along to find out. G&G Automotive is proud to announce this unique restoration project and we're taking you along for the ride.

As Seen On
Photo Gallery
 Front picture from down low of the ducting behind the intercooler radiator. This is identical to ducting for oil cooler. |  We opened up the fake reverse scoops on top of the fenders and installed these NACA ducts. The screen is from a 4.71 blower inlet! The Daytona's had these open from the factor |  The under fender ducting fabricated for the oil cooler on Project Hellbird. |
|---|---|---|
 The big Hellcat engine and trick 6 speed auto trans are dropped out of the car in preparation for mounting on the rotisserie. Next stop: Kustom Body and Paint! |  The big Hellcat engine and trick 6 speed auto trans are dropped out of the car in preparation for mounting on the rotisserie. Next stop: Kustom Body and Paint! |  In this photo of the Hellbird you can see the fuel lines routed along the rail of the subframe connector. The chassis was drilled and lines routed through the subframe plate. This keeps the lines protected and safely away from the drive line in case of breakage. The Hellbird uses a return style fuel system. |
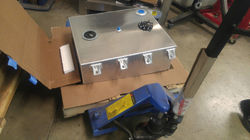
 Tim and Mike are working on checking hood clearance on the Hellcat Supercharger. The hood will require minor modification, keeping the original center crease, and staying all steel. The car will retain the engine in the correct position, keep a low to the ground stance, and nice tire package based on custom made Magnum 500 design wheels. 18x9 fronts and 19x12 rears. This car will be low and have really big sneakers under it! |  Custom aluminum fuel tank and rear mount battery with cut off switch in Project Hellbird. The fuel tank was made by Boyds Welding to a design drawn by Gil. It contains dual Aeromotive fuel pumps, trap doors to contain fuel at pumps, fuel level sending unit, aircraft fuel fill and center vent. Beautiful workmanship. Has 25.5 gallon capacity and does not hang down low under rear of car. It was designed to follow the lower rear fender angle and is barely visible from the rear. All aluminum construc |  You can see here how Project Hellbird's fuel tank gets bolted to the floor. The mounts sit on 1/2 in thick rubber blocks and the tank will be gasketed 360 degrees around opening in floor. |
 Project Hellbird fuel tank. It is designed to drop through the floor in trunk. Note the billet machined mounts on the sides of the tank. These are super strong and sit on top of the trunk floor when the tank is in place. |  Mike sliding the nose of the Hellbird in to check fit. He has it on a special built dolley to make this easier. | 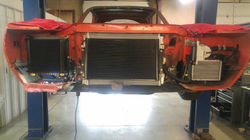 Front picture of the Hellbird before attaching the nose, showing all the coolers and AC condenser mounted. You cannot see the power steering cooler sandwiched between the transmission cooler and radiator. The oil cooler is a Setrab racing unit that has a SPAL fan mounted on the rear for positive air flow in the nose of the Hellbird. Ducting behind the oil cooler and the intercooler, mounted on the driver side, will protect the coolers from road debris and vent the hot air out of the tops of the |
 The nose being fitted onto the Hellcat project. Mike is working on all the ducting and plumbing connections for the oil and water coolers. This car is going to be awesome! |  Okay this deal is really unique. A complete 4 link rear suspension with a custom design Watts link axle locater that will clear 3 inch tailpipes with no clearance issues! This was designed and custom built here at G& G for Project Hellbird. It features a Strange Engineering 9 inch style rear end with 35 spline axles, 3.70 gears and Tru Trac differential. Viking coil over shocks and springs. It is a very clean, uncluttered design, and the Watts link is recognized as the perfect axle locater becau |  Mike is working on mocking up the Vintage Air on Project Hellbird. Here you can see the big Gen 4 unit in place. We are mocking up all systems in the car to complete all fit and finish issues before we go to body shop. |
 Steve's engine is ready to go back in the car now so we can complete all the mechanical work before going into the body shop. Project Hellbird moves forward! |  Steve's engine is ready to go back in the car now so we can complete all the mechanical work before going into the body shop. Project Hellbird moves forward! |  Steve's engine is ready to go back in the car now so we can complete all the mechanical work before going into the body shop. Project Hellbird moves forward! |
 Working on Steves Hellcat. Fitting up custom oil pan used to clear new K frame. The Hellcat has some major differences from the standard Gen3 Hemi. This pan is a Milodon that is custom re configured to work on this engine. The oil pickup tube also requires rework to install. Two of the main cap bolts have to be swapped to install the pickup tube. Amazingly enough, the oil pan gasket/ windage tray (all one piece) already had the provision for moving the main cap bolt with tube support stud to cor |  This photo shows Mike replacing the trunk floor on project Hellbird. After blasting the metal clean to work on chassis we found quite a bit of very small pinholes that had been covered by previous paint and coating. Using an available 2 piece replacement floor, Mike removed all the factory spotwelds and removed the center section of the floor, leaving factory brace intact. He then installed, spot welded, seam sealed new floor sections. When sprayed with sound deadener, the floor will be like new |  In this photo you can see the widened rear wheel well openings. The inner tub was moved to the frame rail giving us approx.2.5 inches extra width for wider tires. The rear end housing has been narrowed 2 inches on each side to take advantage of this. As finished they are actually stronger and better sealed to the chassis than the factory build. Mike welded and reshaped everything to fit smoothly inside the car. Then seam sealed with a special 3m structural adhesive. |
 This photo of project Hellbird shows the frame connectors installed and the rear frame rail supports with 4 link mounts installed. With the connectors installed through the rear chassis rails, securely welded to rails and supports, and the very strong 3/8 steel L plates up front, welded to front rails and connectors, we have a very rigid chassis now. |  This photo shows us developing the parts for Project Hellbird's rear axle locater. We are building a unique Watts link design that keeps the links centered on the axle housing, instead of high and low mounting positions typically used by chassis builders. This gives us excellent clearance for the large 3 inch exhaust system and short, strong side supports on the chassis. |  BracketsBrackets removed from frame on both sides of car to allow correct fitment of new K frame. These brackets originally were the stops, or seats, for the rubber compression bumpers on the factory upper and lower control arms. The major interference was from the lower bracket. It wrapped around the bottom of the frame rail, right over the previously mentioned stamped in "bump" in the rail. This was to provide additional support to the rail in case the car was bottomed out hard while driving and the |
 Engine InstallationMaking the K frame sit squarely against the front chassis rails |  Engine InstallationWe carefully measured and cut a relief opening in firewall adjacent to the intercooler manifold water connections and temperature sending unit. All of the above modifications allowed the engine to install with no interference in engine compartment and solve a few connection issues at same time. |  Engine InstallationSupercharger intercooler manifold had contact at rear of engine to firewall. We removed engine, modified engine mounts to move engine 3/4 inch forward. This accomplished 3 things. First it helped to clear firewall for intercooler temp.sender. Second it gave additional room for Moroso oil cooler/filter adapter at passenger side motor mount. Third it provided additional room for transmission bellhousing to firewall/floor interface area. |
 Engine Installation |  Engine InstallationTransmission was raised up under vehicle and approximate position located under floor. The floor was marked, transmission removed, and then small position holes were drilled in the drawing lines to transfer location to inside of the car. Mike then carefully transferred the pattern to the inside of the floor and cut the floor exactly on the pattern. Now we could finally mate the engine to transmission on the custom dolly Mike built and install in car to check fit. |  Engine InstallationTransmission was raised up under vehicle and approximate position located under floor. The floor was marked, transmission removed, and then small position holes were drilled in the drawing lines to transfer location to inside of the car. Mike then carefully transferred the pattern to the inside of the floor and cut the floor exactly on the pattern. Now we could finally mate the engine to transmission on the custom dolly Mike built and install in car to check fit. |
 Engine InstallationThe engine and transmission were rolled under the car, car was lowered and the engine/transmission were installed in car for first time together. Now we were able to get a true visual on any more clearance issues. The transmission bellhousing was still extremely close to the floor at the firewall/floor location. We removed the engine and transmission, modified the firewall / floor interface area a small additional amount, reinstalled engine/trans assembly and now had a great fit. | 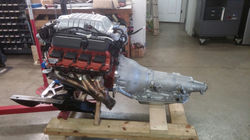 Engine InstallationThe engine and transmission were rolled under the car, car was lowered and the engine/transmission were installed in car for first time together. Now we were able to get a true visual on any more clearance issues. The transmission bellhousing was still extremely close to the floor at the firewall/floor location. We removed the engine and transmission, modified the firewall / floor interface area a small additional amount, reinstalled engine/trans assembly and now had a great fit. |  Engine InstalltionThe engine and transmission were rolled under the car, car was lowered and the engine/transmission were installed in car for first time together. Now we were able to get a true visual on any more clearance issues. The transmission bellhousing was still extremely close to the floor at the firewall/floor location. We removed the engine and transmission, modified the firewall / floor interface area a small additional amount, reinstalled engine/trans assembly and now had a great fit. |
 Engine InstallationThe engine and transmission were rolled under the car, car was lowered and the engine/transmission were installed in car for first time together. Now we were able to get a true visual on any more clearance issues. The transmission bellhousing was still extremely close to the floor at the firewall/floor location. We removed the engine and transmission, modified the firewall / floor interface area a small additional amount, reinstalled engine/trans assembly and now had a great fit. |  Hellcat Engine |  Hellcat Engine in Superbird |
 Project Hellbird |  Project Hellbird |  Hellcat Engine |
 20150427_155228_resized_edited.jpg |  20150427_163707_resized_edited.jpg |  Hellbird Fender |
 Superbird Fender |  10488244_910164415672623_1199199888787726574_n.jpg |  20150223_171431_resized_edited.jpg |
 20150213_133941_resized_edited.jpg |  IMG_20150116_152226.jpg |  IMG_20150116_154020.jpg |
 IMG_20150204_173555.jpgI'm a description. Click to edit me |
bottom of page